WooCommerce does not generate PDF invoices out of the box. When a customer completes an order, they receive a standard order confirmation email – but there is no downloadable PDF invoice attached by default. For most professional online stores, this is a significant gap. Invoices serve as legal documents, aid in customer trust-building, and are often required for B2B transactions and tax compliance in many countries.
Customizing your PDF invoice template goes beyond just inserting a logo. It means shaping a document that reflects your brand, meets regional tax requirements, and communicates order details clearly. This article walks you through everything you need to know – from the tools available to the specific steps for customizing templates – covering both beginner-friendly visual editors and advanced code-based approaches.
Table of Contents
1. Why Invoice Customization Matters
A default WooCommerce invoice is functional but generic. Customers increasingly expect polished, branded documentation alongside their orders, especially in markets where invoice compliance is legally enforced. Here are the main reasons store owners invest in proper invoice customization:
- Brand consistency: An invoice is often the last document a customer receives. Including your logo, brand colours, and tone of voice reinforces brand identity.
- Tax compliance: EU VAT, GST in India and Australia, ABN numbers in Australia, and other regional requirements mean invoices must carry specific fields. Generic templates rarely accommodate all of these.
- Customer experience: A well-designed invoice reassures customers. For B2B buyers, especially, it can accelerate payment approvals.
- Operational needs: Packing slips, shipping labels, and delivery notes that reflect correct product and order data reduce fulfilment errors.
2. Core Elements of a WooCommerce PDF Invoice
Before diving into customization methods, it helps to know the standard components that belong on any professional WooCommerce invoice:
- Store name, logo, and contact information
- Invoice number and date
- Customer billing and shipping address
- Itemized order table (product name, quantity, price, subtotal)
- Tax breakdown (VAT, GST, or applicable taxes)
- Order total, shipping cost, and any discounts
- Payment method and status
- Footer with terms, return policy, or custom notes
Depending on your business type and geography, you may also need fields like VATIN, ABN, company registration number, or a QR code linking to the order.
Also Read


3. Plugin Options:
WebToffee PDF Invoices & Packing Slips
WebToffee’s PDF Invoices & Packing Slips for WooCommerce is a widely used plugin that automates the generation and delivery of order documents directly from your WooCommerce store. The free version, available on WordPress.org, lets you automatically create invoices and packing slips, attach them to order confirmation emails, and allow customers to download them from their My Account page. It also covers the basics of template personalization – adding your store logo, name, address, and a custom footer – without requiring any coding. For most small to mid-sized stores, the free tier handles day-to-day invoicing needs without much configuration.
For stores that need more, the premium version extends the plugin with multiple pre-built templates, a code editor for advanced layout control, credit notes, and bulk export by date range or order status. The free version also supports UBL/XML e-invoicing formats for stores with e-invoicing requirements. A separate Customizer add-on is also available for stores that need a visual drag-and-drop editor for full template design control. It also handles tax fields like VAT, GST, and VATIN, making it suitable for stores with regional compliance requirements. The premium version supports WPML for multilingual stores. RTL language support is available via the free mPDF add-on. Both premium and free versions are actively maintained and compatible with the current WooCommerce and PHP versions.
PDF Invoices & Packing Slips for WooCommerce – WP Overnight
PDF Invoices & Packing Slips for WooCommerce is one of the oldest and most widely installed invoice plugins on WordPress.org. The free version is template-driven: you copy the plugin’s PHP template files into your child theme and edit HTML, CSS, and PHP directly. This approach offers precise control but requires a working knowledge of PHP.
The Professional extension adds credit notes, proforma invoices, Dropbox/Google Drive document backup, and multilingual support via WPML and Polylang. A more recent Premium Templates add-on offers pre-designed templates. WP Overnight also added Peppol e-invoicing support, making it a strong choice for stores operating in regions where Peppol compliance is mandated.
Challan – PDF Invoice & Packing Slip for WooCommerce

Challan is a popular freemium option, particularly known for its relatively low entry price for the premium plan. It supports visual and code-based customization, allows inclusion of barcodes, QR codes, signatures, and custom stamps, and handles RTL layouts. The pro version includes configurable paper sizes, page numbering, and a ‘Paid’ stamp feature.
It auto-generates invoices upon order placement and attaches them to confirmation emails. For stores selling digital products, Challan also allows custom fields such as license keys to appear directly on the invoice.
4. Step-by-Step:How to Customize Invoice Templates
The exact steps vary by plugin, but the general process is consistent. The example below uses the WebToffee PDF Invoices plugin, which is representative of the visual editor workflow used by most freemium plugins.
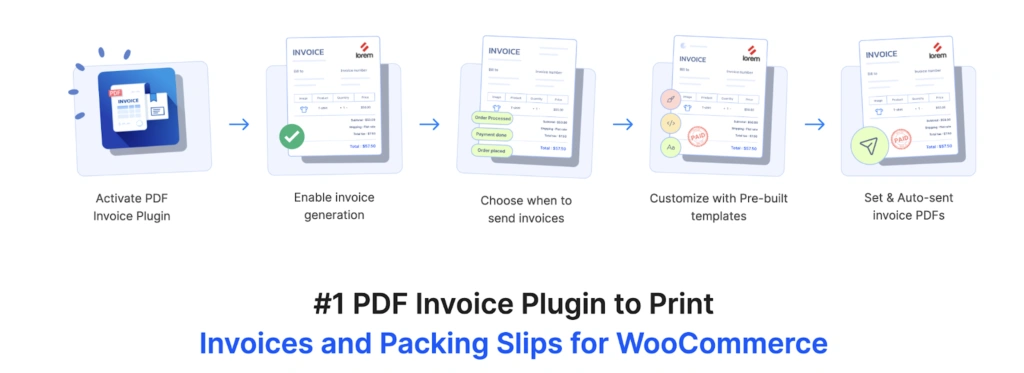
Step 1: Install and Activate the Plugin
- Go to WordPress Dashboard > Plugins > Add New.
- Search for your chosen plugin. For WebToffee, search ‘WebToffee WooCommerce PDF Invoices’.
- Click Install Now, then Activate.
Step 2: Run the Setup Wizard
Most invoice plugins include an initial setup wizard. This lets you configure which documents to enable (invoice, packing slip), which order statuses trigger automatic generation, and whether to attach the PDF to order emails. Complete this before diving into template design.
Step 3: Open the Invoice Customize Tab
Navigate to Invoice/Packing > Invoice > Customize. This is where template editing happens. In the free version, you can typically modify:
- Store name and contact details
- Company logo (upload from media library)
- Invoice heading and footer text
- Template color scheme
In the premium version, you get access to multiple pre-built templates.
Step 4: Choose a Template Layout
Click ‘Change Layout’ to browse available templates. Pre-built options (available in the premium version) typically include minimal, modern, and detailed layouts.. Select one as your starting point – you can fully override it later using the visual or code editor.
Step 5: Customize Using the Visual Editor
The visual editor allows you to toggle individual invoice elements on and off, reorder sections, and configure what appears in the product table. Common options include:
- Enable/disable product images in the item table
- Show/hide product SKU, categories, or attributes
- Add custom columns (e.g., weight, brand)
- Configure tax display (inclusive, exclusive, or both)
- Set payment gateway details
- Add custom fields for order or product meta (free version supports one meta field; multiple fields require premium)
Step 6: Use the Code Editor for Advanced Changes
If you need precise layout control – adjusting padding, changing font families, restructuring the invoice header – switch to the code editor (a premium feature in WebToffee). This editor exposes the HTML/CSS (and sometimes PHP) that drives the template.. For WP Overnight’s plugin, this step involves copying template files to your child theme folder and editing them directly in a text editor.
Step 7: Preview and Activate
Most visual editors provide a real-time or on-demand preview. Generate a test invoice using a real (or test) order to verify the output. Check for:
- Logo placement and sizing
- Correct address formatting
- Tax amounts and totals
- Font readability at standard PDF viewing zoom levels
- Footer text and legal disclaimers
Once satisfied, click Save & Activate.
5. Visual Editor vs. Code Editor: Which to Use
Both approaches have clear trade-offs. The right choice depends on your technical comfort level and the degree of customization you need.
Visual Editor
- Best for: Non-developers, quick brand customization, template selection
- Pros: Faster, safer, no risk of breaking the template with a syntax error
- Cons: Limited to what the editor exposes; cannot change the fundamental HTML structure
Code Editor / PHP Templates
- Best for: Developers, complex layouts, adding custom PHP logic or dynamic fields
- Pros: Complete control over every pixel; can integrate WooCommerce hooks and filters
- Cons: Requires PHP/HTML/CSS knowledge; risk of breaking invoice generation if errors are introduced
For most WooCommerce store owners without development resources, a plugin with a strong visual editor is the more practical path. Plugins like WebToffee, RedNao, and Challan are particularly optimized for this use case. For agency-developed stores where developers maintain the codebase, WP Overnight’s template file approach is well-documented and extremely flexible.
6. Common Mistakes to Avoid
- Not using a child theme for template files: If you are editing PHP template files directly in the plugin folder, a plugin update will overwrite your changes. Always copy templates to your child theme or use a code editor within the plugin dashboard.
- Skipping the preview step: CSS that works in browsers may not render correctly in DomPDF or mPDF. Flexbox and CSS Grid are poorly supported. Test your template with an actual order before going live.
- Ignoring legal requirements: Invoice fields required by law vary by country. Check your local regulations before finalizing your template – missing a mandatory field (such as a VAT number or company registration) can make invoices non-compliant.
- Using web fonts without embedding: PDF renderers cannot load Google Fonts over the internet. Any custom fonts need to be embedded or referenced through the plugin’s font management system.
7. Frequently Asked Questions
Does WooCommerce generate PDF invoices by default?
No. WooCommerce sends order confirmation emails but does not generate downloadable PDF invoices. You need a dedicated invoice plugin to enable this functionality.
Which invoice plugin is best for beginners?
For non-developers, plugins with a strong visual editor – such as WebToffee PDF Invoices, Challan, or RedNao’s PDF Invoice Builder – will be more accessible. WP Overnight’s free plugin is powerful but requires PHP editing for meaningful customization.
How do I add a logo to a WooCommerce invoice?
In most plugins, upload your logo via the plugin’s General Settings page, then enable the logo element in the invoice customization tab. Ensure the logo is a PNG with a transparent background for best results.
Can I have different templates for invoices and packing slips?
Yes. Most plugins treat each document type (invoice, packing slip, credit note, shipping label) as a separate template. You configure and customize them independently.
Conclusion
Customizing WooCommerce PDF invoice templates is not a one-size-fits-all task. The right approach depends on your store’s size, technical capabilities, geographic market, and document requirements. Ultimately, the best invoice setup is one your team can maintain without friction. A visually impressive template that requires a developer every time you need a minor update is less valuable in practice than a simpler one that your operations team can manage independently.