

If you’re an employee at the Food Corporation of India (FCI), chances are you’ve heard about the HRMS portal — and maybe even felt a little overwhelmed by it. Don’t worry, you’re not alone. The FCI HRMS is a powerful system, but navigating it for the first time can feel like stepping into a digital maze. So today, let’s break it all down — conversationally, clearly, and just the way you’d want someone to explain it over a cup of coffee.
This guide walks you through everything: logging in, downloading your payslip, applying for leave, updating your profile, understanding ESS and MSS, and yes, even grabbing that all-important medical card. Let’s get started.
Table of Contents
- How FCI HRMS Actually Works for Employees
- Where to Begin? Your HRMS Login Made Simple
- Who’s Allowed to Access the FCI HRMS Portal?
- Inside the Employee Digital Portal — What You See After Login
- ESS vs MSS — What Do They Really Mean?
- What the Employee Dashboard Looks Like
- How to View & Update Your Profile
- How to Raise a Profile Edit Request
- Who Exactly Is the Nodal Officer?
- How to Apply for Leave in HRMS
- Getting Your FCI Medical Card
- How to Search for Employees in HRMS
- Core HR Services You Can Access Online
- How to Download Your Salary Slip in HRMS
- Additional Questions Employees Often Ask
How FCI HRMS Actually Works for Employees
Think of the FCI HRMS as your personal digital HR office. Whether you want to apply for leave, download your salary slip, update your profile, or track your service record — everything lives here. No more running to the HR desk or chasing your nodal officer for every small request.
Inside HRMS, you can:
- Apply for leave and check your available balance
- Download salary and pay slips
- Update personal info
- Raise reimbursement claims
- Track service history
- Access compensation and benefits
- Check attendance records
- Manage ESS and MSS — all under one login
Some tasks still require your nodal officer’s approval, but most day-to-day actions are now at your fingertips.
Also Read
Where to Begin? Your HRMS Login Made Simple
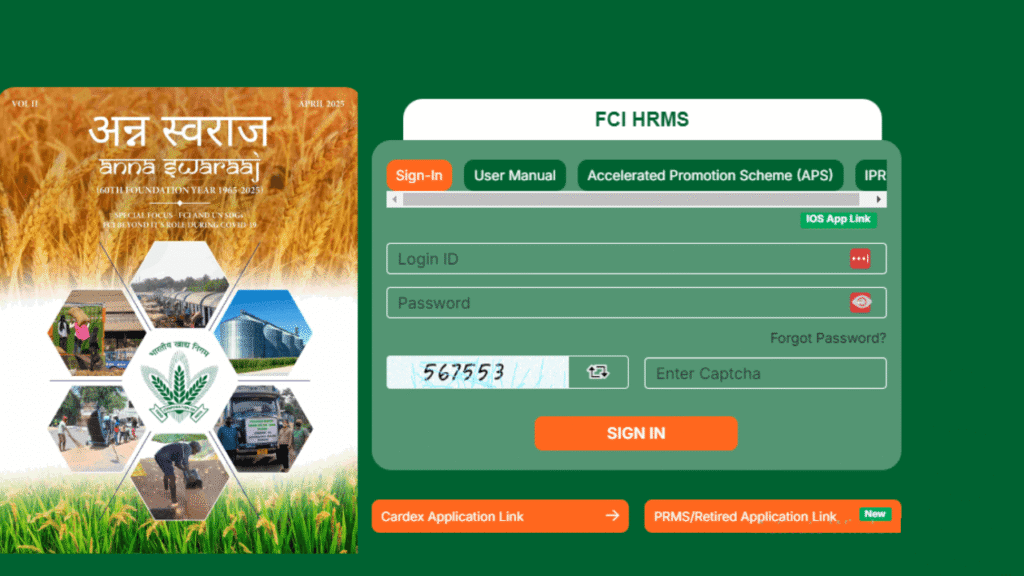
Before doing anything inside the system, you need to log in. Here’s how to get started — without the confusion.
For Laptop or PC Users
Head over to the official login page: hrmsfci.in/login
For Smartphone Users
- Android users: Install the HRMS app from the Play Store.
- iOS users: Download the app via the official HRMS website.
Your First-Time Login Checklist
- Open the portal in Chrome or any updated browser.
- Enter your Login ID — this is your employee number.
- Type in the password shared by the FCI HR/IT team (reset it immediately after first login).
- Solve the captcha and tap Sign In.
If login isn’t working:
- Make sure you’re entering the employee number, not PF number.
- If OTP isn’t coming, your mobile number may be outdated — request an update via Profile Edit Request.
- If your account is locked, wait 30 minutes before trying again.
- Still stuck? Contact HRMS Support:
- 011-43527574 / 011-23411825
- hrmssupport.fci@gov.in
Always include your employee number, name, office, and issue details.
Who’s Allowed to Access the FCI HRMS Portal?
Not everyone can hop into HRMS. Access is limited to:
- Regular FCI employees: officers, clerical staff, depot workers
- Managers and competent authorities
- Retired employees (for pension and service record access)
- Contractual staff (only with limited access if approved)
Generally, outsourced staff do not get full access.
Inside the Employee Digital Portal — What You See After Login
Once logged in, you’ll land on your Employee Home Dashboard. This is where everything lives:
- Dashboard: Your hub for updates and requests
- Attendance: Biometric attendance details
- Leave: Pending and available leaves
- Reimbursements: Submit and track claims
- Directory: Search for colleagues
- Training: View training programs
- Reports: Download payroll reports
- Policies & Circulars: Find orders, schemes, postings
- ConnectPlus: Chat internally within HRMS
- Performance: Promotions and evaluation data
- Help: Nodal officer and service request section
ESS vs MSS — What Do They Really Mean?
You’ll notice two major sections in HRMS: ESS and MSS.
ESS (Employee Self Service)
This is all about you. Your data, your requests, your information.
MSS (Manager Self Service)
Managers use this to approve or reject team requests — like leave, attendance updates, and reimbursements.
Both are available from a single login.
What the Employee Dashboard Looks Like
The dashboard gives you an organized snapshot of your work life:
- E-Notice: Latest HR circulars
- My Time: Attendance details
- My Team: Your reporting hierarchy and teams
- Reimbursements: Track claims
- Policies & Circulars: All official communications
- Leaves: Balance, holidays, applications
How to View & Update Your Profile
Tap your profile icon at the top-right corner to access:
- Work Info
- Personal Info
- Dependents & Nominees
- Emergency Contacts
You Can Update These Yourself:
- Mobile number
- Email ID
- Nominee details
- Emergency contact
- Reporting officer
These Need Nodal Officer Approval:
- Bank account details
- Qualification updates
- Permanent address
- Transfer profile
Important: Transfer profile corrections must be done within 10 days.
How to Raise a Profile Edit Request
If the change requires approval:
- Open My Profile
- Scroll to the bottom
- Click Add Request
- Write a subject, like “Permanent Address Change”
- Add a short description (minimum 100 words)
- Upload proof (PDF/photo)
- Hit Submit
Processing usually takes 7–10 working days.
Who Exactly Is the Nodal Officer?
Nodal officers are HR personnel assigned to your unit. They handle:
- Profile edit approvals
- Transfer profile updates
- Biometric resets
- Role and permission assignments
- Linking service book data
Pro tip: Always approach your nodal officer first before mailing the central team.
How to Apply for Leave in HRMS
Applying for leave is straightforward:
- Go to Leave Management in ESS
- Check leave balance
- Click Add Leave Request
- Select your leave type (child care, special casual, restricted holiday, etc.)
- Enter the number of days
- Add remarks and upload documents (PDF)
- Hit Submit
Getting Your FCI Medical Card
Your medical identity card is essential for treatment at empanelled hospitals.
Here’s how to download it:
- Log in to HRMS
- Open the ESS Dashboard
- Select Medical
- Choose Self or Dependent
- Verify details
- Click Generate/Download Medical Card
It’ll download as a PDF.
For a detailed walkthrough, you can also check our complete guide on Relipay Login 2025: Quick & Secure Access to RNFI Services to make your login process even smoother.
How to Search for Employees in HRMS
- Go to Directory → Employee Hierarchy
- Enter employee ID or name
- Use filters like zone, region, office
- Hit Search
You’ll see their designation, office, and email.
Core HR Services You Can Access Online
From the Core HR section, you can handle major tasks like:
- Telephone Sanction Request
- Transfer Request
- Step-Up Request after promotion
- Separation Request (retirement/resignation)
- My Service Book
- My Portfolio
Your Service Book is one of the most important documents — crucial for promotions and retirement.
How to Download Your Salary Slip in HRMS
- Open Reports
- Go to Payroll Reports
- Select Salary Slip
- Choose month and year
- Click View/Download PDF
Other Payroll Reports:
- Form 16
- Income Tax Computation
- CPF/EPF statements
- Arrear slips
Tip: Download your pay slips every month. Banks often ask for the last 6–12 months.
Additional Questions Employees Often Ask
Can I update my bank details myself?
No. Only nodal officers can approve such changes.
How do I download the FCI HRMS app?
Search for the official HRMS app on the Play Store, install it, and log in using your employee ID.

